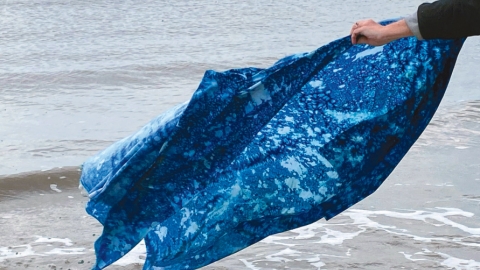
Materials you need:
Cyanotype paper (I recommend sunprints.org.)
2 (9- by 13-inch) sheet pans
Water
Optional:
Hydrogen peroxide
Clothesline
Clothespins
The easiest way to create cyanotypes is with pre-treated paper. The process of mixing chemicals takes some time and can add variations in color or brown spots if not mixed well. It’s fun to get into once you’re comfortable with the process, but for kids and ease, I recommend buying cyanotype packets.
Be creative in what you use for the process. Prints can be made with vegetable cuttings from meal prep, weeds from your yard, objects from a walk, or any objects around your home. (Use care with flowers, please: Bees & butterflies need them more than we do, and we need them.)
The best time for creating the prints is midday, between 11am and 1pm, when the sun is harshest, though earlier or later is also fine.
Exposure time varies depending on cloud coverage and time of day. The average is five minutes on a sunny day at noon, to 10—15 minutes on a cloudy day or at 5pm on a clear day. I don’t necessarily recommend it, but exposure time during a thunderstorm is around 30—45 minutes, to give an idea of how cloud coverage affects the wait time.
Using the pans:
Fill one with water, and rinse cyanotype in it. This stops the exposure process.
Fill the second with water + about 1—2 teaspoons (6ml) of hydrogen peroxide. This second rinse helps the print oxidize faster (but can be skipped; it happens naturally too).
Once rinsed, find a place to dry outside of direct sunlight. Hanging a clothesline between trees can be perfect for this but laying them flat on an outdoor table works fine too.
Making Ink
I use five natural ink recipes from hobbyfarms.com for reference.
Common colors from food:
Pink: Avocado (grocery store)
Red turns blue: Hibiscus (your yard or garden, grocery store)
Red or yellow: Beets (local farms like Plant It Forward, Finca Tres Robles)
Yellow: Marigold (Local Flora or home garden)
Green: Moringa (Base 3 Farms Moringa can be purchased at Finca Tres Robles or online)
Green: Spinach/kale (Plant It Forward, Finca Tres Robles)
Blue: Black beans (dried or fresh, not canned, from grocery store or garden)
Purple: Red cabbage (farmers market or grocery store)
Brown: Pecans (Local Flora or Rio Grande Organic)
Other ink-making materials:
Gum arabic
Thyme or oregano oil
The most basic process for making inks is to cook food as usual and use the water as an ink wash.
For flowers and avocado seeds (or any pink/red pigments), it helps to heat them on a low heat until you can’t see the spoon you use to stir it.
Pecans, walnuts and black beans aren’t as heat sensitive.
For greens and berries: Don’t heat them; chlorophyll breaks down and becomes brown. If using spinach, it’s best to use a blender or food processor and paint with the liquid it makes.
Moringa Paint:
1 tablespoon moringa
1 egg white
Mix powder with egg white to form a paste. Use with tempera/acrylic brushes on cardstock.
Pecan Ink
½ cup dried hulls
1 cup water
½ teaspoon gum arabic
3 drops thyme or oregano oil
Boil hulls with water for 30 minutes. Strain out the hulls and whisk in the gum arabic. Cool and pour into a small bottle. Add the thyme essential oil and shake to combine.
Beet Ink
2—3 beets
4 cup water (or enough to submerge beets until they soften)
½ teaspoon gum arabic
3 drops thyme essential oil
Simmer beets with the water until water is red. Strain out the beets. Whisk in the gum arabic until it is dissolved. Cool and pour into a small bottle. Add 3 drops of thyme oil and shake a couple times to mix. Paint while eating beets cooked in your favorite dish.